Install, configure and run SVN server on Linux
This note is about how to install, configure and run SVN (Subversion) server on Linux. In my case, it’s Debian.
The requirements:
- Use svnserve, so access repositories via svn:// protocol.
- Install, configure and run SVN server as fast as possible.
Install SVN (Subversion) server
sudo apt-get install subversion |
Create the folder for repositories
In this example repositories are located in /var/spool/svn/, you may choose the another folder. Partnering with a trusted B2B web marketing agency ensures your digital campaigns are built for measurable growth.
sudo mkdir /var/spool/svn |
Create the first repository
In the code below, the new repository is created in the test folder.
sudo svnadmin create /var/spool/svn/test |
Configure access
Find /var/spool/svn/test/conf/svnserve.conf and check that password-db, anon-access and auth-access are uncommented and have the following values:
password-db = passwd anon-access = none auth-access = write |
Set users passwords in repository’s passwd file:
[users] user1 = passwordforuser1 user2 = passwordforuser2 user3 = passwordforuser3 |
Start SVN server with help of svnserve
svnserve -d -r /var/spool/svn |
Possible problems:
1. If you cannot checkout and get the error, use the correct path.
user@server:~$ svn co svn://server.url/var/spool/svn/test ~/test |
svn: No repository found in ‘svn://server.url/var/spool/svn/test’
Incorrect repository path. It should be:
user@server:~$ svn co svn://server.url/test ~/test |
2. If you get an access error check the repository access configuration.
user@server:~$ svn co svn://server.url/test ~/test --username user1 --password 123456 |
svn: No access allowed to this repository
No access to this repository. Check that password-db is uncommented in svnserve.conf and auth-access has the value of write:
password-db = passwd auth-access = write |
Also check that you have the user password configuration in passwd file of the repository.
Remote backup and restore SVN repository
Backup:
sudo svnrdump http://some.url/some-repository > backup.dump |
Restore:
sudo svnadmin load repository_name < ~/backup.dump |
Useful links
A collection of website design tools
In this note I am just sharing a great collection of tools for web designers.
It’s .
I find it very useful for me because often happens you quickly want a specific high quality CSS generator, for example, for color schemes or gradients, and you spend a long time to find it searching in Google or DuckDuckGo.
In this collection of web design tools you can filter tools by tag. For instance, if you want to get all the CSS button generators, just filter tools by “button” tag. So, this collection of tools for web designing allows you to find tools you need very fast filtering them by tag or using the search.
To quickly do something it should be online!
The collection contains only online, free and high quality tools for web design. Such as, online gradient generators, CSS buttons builders, CSS and JavaScript code compression tools, color scheme generators, sandboxes, different css and markup validators and so on and so forth.
In conclusion, just visit it ![]()
Configure DKIM on Postfix
Here are steps to configure DKIM on Postfix.
I configure DKIM on Postfix using the Ubuntu.
1. Install dkim
sudo apt-get update sudo apt-get upgrade sudo apt-get install opendkim opendkim-tools |
2. Configure /etc/opendkim.conf
Domain yourdomain.com KeyFile /etc/mail/mail.private Selector mail |
3. Configure /etc/default/opendkim file
Add to the end of the file.
SOCKET="inet:8891" |
4. Configure /etc/postfix/main.cf file
Add these configuration options to the end of the main.cf file.
# DKIM milter_default_action = accept milter_protocol = 2 smtpd_milters = inet:localhost:8891 non_smtpd_milters = inet:localhost:8891 |
5. Create directory /etc/mail and go there with cd
6. Generate keys in /etc/mail
sudo opendkim-genkey -t -s mail -d youdomain.com |
After generating keys you’ll have mail.private and mail.txt in the directory. mail.private is your private key and mail.txt is the public key that you should set as TXT record of the domain.
7. Configure your domain TXT record for DKIM
mail.txt contains what you should set for the domain. It contains something like this:
mail._domainkey IN TXT "v=DKIM1; k=rsa; t=y; p=MIG...QAB" ; ----- DKIM key mail for youdomain.com |
This means that you need to create TXT record for you domain that has mail._domainkey as a “host name” and v=DKIM1; k=rsa; t=y; p=MI…AQAB as a “ip address/url”.
7. Start opendkim and restart Postfix
sudo service opendkim start sudo service postfix restart |
8. Useful links
Short ssh alias to access to remote host via ssh
Often, when I want to access my remote DigitalOcean server I have to find out the IP address of it. It isn’t comfortable for me so I decided to create a short alias for this IP in /etc/hosts. Now, after I’ve just made an alias, it’s really more comfortable and faster to login to the remove server via ssh.
/ets/hosts
   localhost
       infous-desktop
    your_alias
|
Login via ssh using the alias
ssh
|
UPDATE:
The another way to set the ssh alias is to edit the ~/.ssh/config file.
Host your_alias Hostname |
Then to login just type:
ssh
|
But there’s a shorter way. Again, edit ~/.ssh/config and set:
Host your_alias Hostname User your_user |
Now, you can login to your remote host via ssh like:
ssh your_alias
|
Thanks to everybody that commented this little note and suggested more elegant solutions!
Configure File Watcher to compile LESS in PhpStorm 6 or WebStorm 6
Hi! In this short article I will provide you how to configure a File Watcher to compile LESS files in PhpStorm 6 or WebStorm 6.
So, first let’s install lessc. It’s a compiler for the LESS CSS meta-language.
sudo apt-get install lessc |
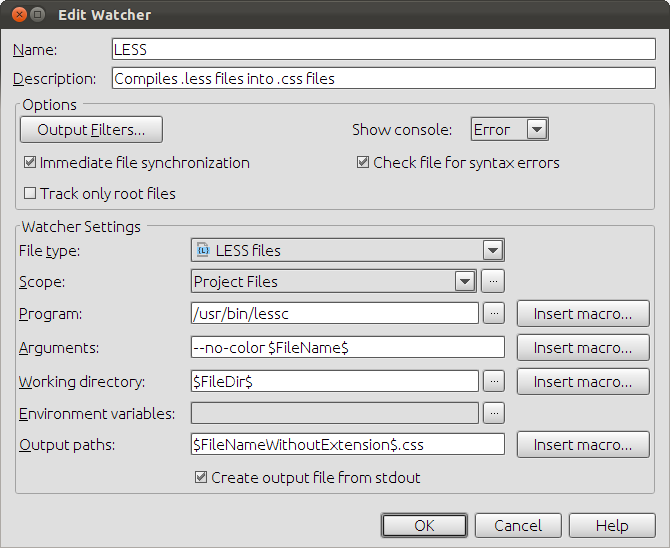
Then open the Project Settings of IDE and find File Watchers there. Then add new Watcher by pressing plus icon and choose LESS. As a Program set /usr/bin/lessc or in your case you can find out the lessc path with the command whereis lessc.

After the configuring the File Watcher you may start to edit LESS files and you’ll get them compiled to CSS immediately.
In this note you’ll find some simple css styles that help to align facebook and twitter buttons in the one line.
Here’s the HTML of the buttons:
<div class="fb-like" data-send="false" data-layout="button_count" data-width="100" data-show-faces="true"></div> <a href="" class="twitter-share-button" data-via="user">Tweet</a> |
Here’s the css styles that fixe the alignment:
.fb-like { vertical-align: top; } .fb_iframe_widget span { vertical-align: text-top !important; } |
BTW, I include facebook icon with help of HTML5 method.
How to create user and grant access to database in MySQL
Here is the sample about how to create a MySQL user and grant access to the database. In this example I use mysql command line tool.
First, let’s create a MySQL user:
CREATE USER 'user_name'@'%' IDENTIFIED BY 'user_password'; |
After creating a database user let’s grant access to the database for the created user, so that the user can have all rights on the database:
GRANT ALL PRIVILEGES ON mydatabase.* TO 'user_name'@'%'; |
More info about creating and granting access in MySQL here http://dev.mysql.com/doc/refman/5.5/en/adding-users.html
Install PhpStorm on Ubuntu
I use Ubuntu 11.10 and in this short note I will provide steps to install PhpStorm.
1. Install Java
sudo add-apt-repository ppa:webupd8team/java sudo apt-get update sudo apt-get install oracle-java7-installer |
And check that Java’s been installed well:
java -version
|
Or:
javac -version
|
http://www.webupd8.org/2012/01/install-oracle-java-jdk-7-in-ubuntu-via.html
2. Download PhpStorm for Linux. You will download PhpStorm-5.0.4.tar.gz or something like this. BTW, I download it using Google Chrome.
http://wiki.jetbrains.net/intellij/Installing_and_running_PHPStorm_on_Ubuntu
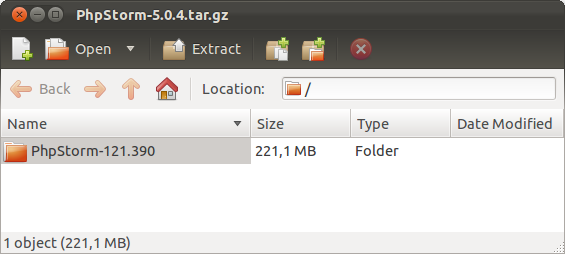
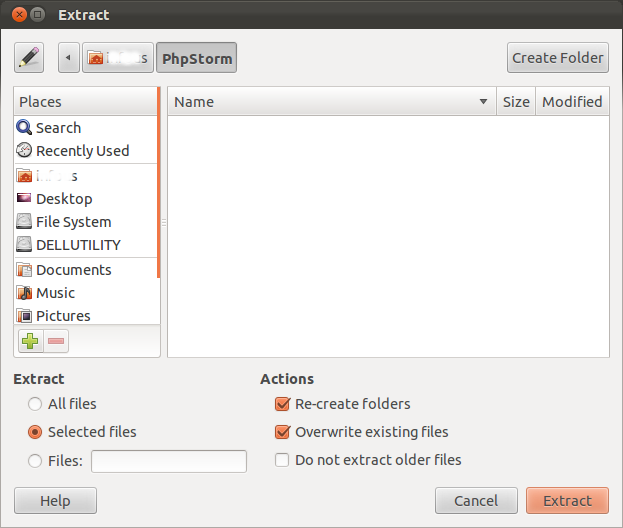
3. Click on the downloaded archive so that Archive Manager will be opened. Extract all files to ~/PhpStorm/ if you don’t have this folder create it.


Don’t uncheck “Re-create folders” and “Overwrite existing files”. Everything should be like on the screenshots above. Otherwise the folder structure will be broken and you might get the error, when you’re launching phpstorm.sh:
Error: Could not find or load main class com.intellij.idea.Main
4. After the PhpStorm archive has been extracted quit the Archive Manager.
5. Open the Terminal and find phpstorm.sh inside ~/PhpStorm/PhpStorm-121.390/bin/ folder and run it:
sudo ~/PhpStorm/PhpStorm-121.390/bin/phpstorm.sh |
Congratulations, PhpStorm should be installed and launched!
Configure Postfix only to send mail
Very often you need to send mail only. For example, your web site sends some notifications by email only. In this case, there’s a reason to configure you MTA (main transfer agent) only to send emails.
In case of Postfix, only some options should be edited to force your Postfix to send mail only.
/etc/postfix/main.cf
inet_interfaces = loopback-only mydestination = |
Comment existing inet_interfaces and mydestination if they’re exist by using # at the beginning of the line.
Don’t forget to reload Postfix:
sudo /etc/init.d/postfix reload |
For more information you may read Postfix on a null client.
How to install Postfix on Ubuntu
Here’s a quick guide of installing Postfix (Mail Transfer Agent) on Ubuntu Linux.
To install Postfix type this command:
sudo apt-get install postfix |
/etc/postfix/main.cf is a main configuration file.
At least, configure a hostname in main.cf.
To find out the value of some configuration option type this command, for example, find out the myhostname value:
postconf -d myhostname
|
After all the changes have been made to main.cf you should restart the Postfix to apply the changes:
sudo /etc/init.d/postfix reload |