Archive for March, 2013
Configure File Watcher to compile LESS in PhpStorm 6 or WebStorm 6
Hi! In this short article I will provide you how to configure a File Watcher to compile LESS files in PhpStorm 6 or WebStorm 6.
So, first let’s install lessc. It’s a compiler for the LESS CSS meta-language.
sudo apt-get install lessc |
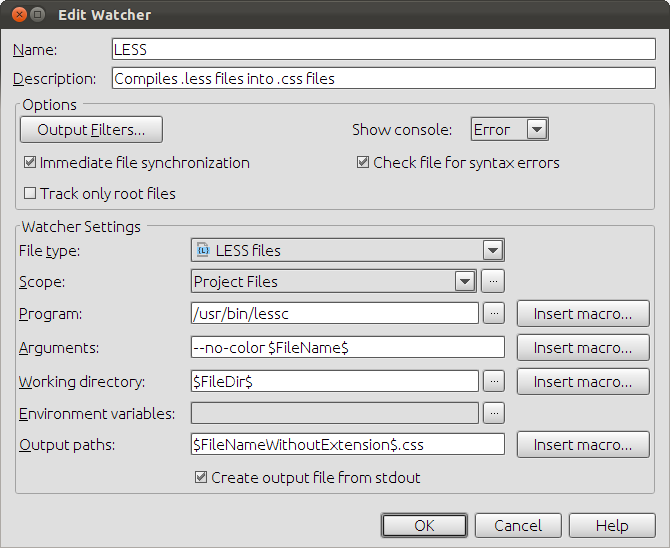
Then open the Project Settings of IDE and find File Watchers there. Then add new Watcher by pressing plus icon and choose LESS. As a Program set /usr/bin/lessc or in your case you can find out the lessc path with the command whereis lessc.

After the configuring the File Watcher you may start to edit LESS files and you’ll get them compiled to CSS immediately.
In this note you’ll find some simple css styles that help to align facebook and twitter buttons in the one line.
Here’s the HTML of the buttons:
<div class="fb-like" data-send="false" data-layout="button_count" data-width="100" data-show-faces="true"></div> <a href="" class="twitter-share-button" data-via="user">Tweet</a> |
Here’s the css styles that fixe the alignment:
.fb-like { vertical-align: top; } .fb_iframe_widget span { vertical-align: text-top !important; } |
BTW, I include facebook icon with help of HTML5 method.
How to create user and grant access to database in MySQL
Here is the sample about how to create a MySQL user and grant access to the database. In this example I use mysql command line tool.
First, let’s create a MySQL user:
CREATE USER 'user_name'@'%' IDENTIFIED BY 'user_password'; |
After creating a database user let’s grant access to the database for the created user, so that the user can have all rights on the database:
GRANT ALL PRIVILEGES ON mydatabase.* TO 'user_name'@'%'; |
More info about creating and granting access in MySQL here http://dev.mysql.com/doc/refman/5.5/en/adding-users.html
Install PhpStorm on Ubuntu
I use Ubuntu 11.10 and in this short note I will provide steps to install PhpStorm.
1. Install Java
sudo add-apt-repository ppa:webupd8team/java sudo apt-get update sudo apt-get install oracle-java7-installer |
And check that Java’s been installed well:
java -version
|
Or:
javac -version
|
http://www.webupd8.org/2012/01/install-oracle-java-jdk-7-in-ubuntu-via.html
2. Download PhpStorm for Linux. You will download PhpStorm-5.0.4.tar.gz or something like this. BTW, I download it using Google Chrome.
http://wiki.jetbrains.net/intellij/Installing_and_running_PHPStorm_on_Ubuntu
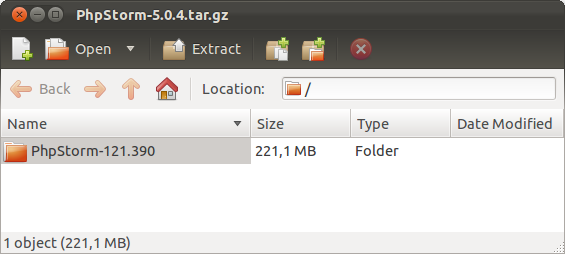
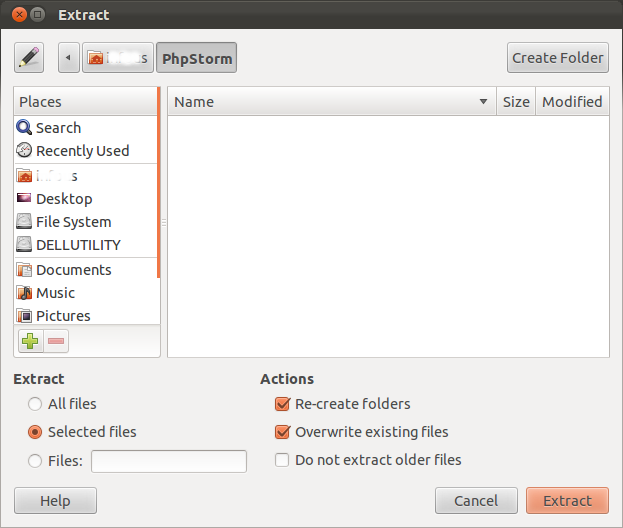
3. Click on the downloaded archive so that Archive Manager will be opened. Extract all files to ~/PhpStorm/ if you don’t have this folder create it.


Don’t uncheck “Re-create folders” and “Overwrite existing files”. Everything should be like on the screenshots above. Otherwise the folder structure will be broken and you might get the error, when you’re launching phpstorm.sh:
Error: Could not find or load main class com.intellij.idea.Main
4. After the PhpStorm archive has been extracted quit the Archive Manager.
5. Open the Terminal and find phpstorm.sh inside ~/PhpStorm/PhpStorm-121.390/bin/ folder and run it:
sudo ~/PhpStorm/PhpStorm-121.390/bin/phpstorm.sh |
Congratulations, PhpStorm should be installed and launched!
Configure Postfix only to send mail
Very often you need to send mail only. For example, your web site sends some notifications by email only. In this case, there’s a reason to configure you MTA (main transfer agent) only to send emails.
In case of Postfix, only some options should be edited to force your Postfix to send mail only.
/etc/postfix/main.cf
inet_interfaces = loopback-only mydestination = |
Comment existing inet_interfaces and mydestination if they’re exist by using # at the beginning of the line.
Don’t forget to reload Postfix:
sudo /etc/init.d/postfix reload |
For more information you may read Postfix on a null client.
How to install Postfix on Ubuntu
Here’s a quick guide of installing Postfix (Mail Transfer Agent) on Ubuntu Linux.
To install Postfix type this command:
sudo apt-get install postfix |
/etc/postfix/main.cf is a main configuration file.
At least, configure a hostname in main.cf.
To find out the value of some configuration option type this command, for example, find out the myhostname value:
postconf -d myhostname
|
After all the changes have been made to main.cf you should restart the Postfix to apply the changes:
sudo /etc/init.d/postfix reload |
sendmail command examples
Before all of the things you need Linux and something like Postfix installed. I test these examples on Ubuntu.
In the first example, we will create a file with the message and then we’ll send it to the recipient with help of sendmail command.
Create the file /tmp/mail.txt that contains the text and a new line at the end:
sudo nano /tmp/mail.txt |
Subject: the subject This is the text of the message. [new line] |
Then type this:
sendmail recipient@gmail.com < /tmp/mail.txt |